Difference between revisions of "How to Embroider with the Barudan BENT-ZQ-201U"
(→If all files were removed from memory at the end of the previous session, you will see the error message shown below. It's the Automat's way of letting you know that there is no file saved in memory to be embroidered.) |
|||
| Line 46: | Line 46: | ||
| + | ====The next screen to appear (the first screen if there are files stored in memory) is the Origin Set Screen. Select the 'D' button under the return icon to allow the sewing head to orient itself.==== | ||
| + | [[File:Barudan Screen Initial Origin set.png|border|500px|alt=Power Switch and On Button]] | ||
| + | <div style="clear: both"></div> | ||
Revision as of 14:08, 8 March 2023
The Barudan BENT-ZQ-201U at our MakerSpace is a powerful tool, but it is not a new machine. This model was built between 1997 and 2003, so the technology isn't state-of-the-art, but it does work. When you are using the Barudan, remember to take things slowly and wait for the machine to respond before trying to move forward to the next step by pushing another button. If you confuse the machine, simply power down and start over.
Contents
- 1 Anatomy of the Automat
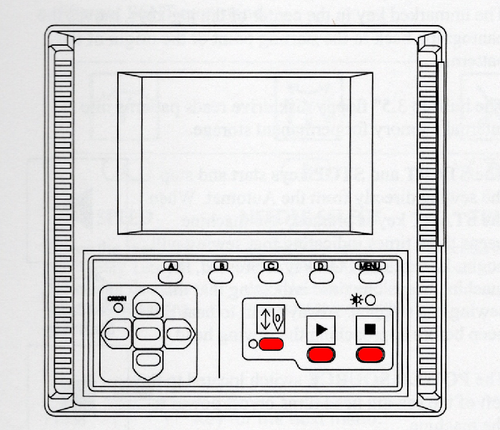
- 1.1 The Automat is where you will find all of the commands for operating the machine, for moving through various menus, and for executing menu commands.
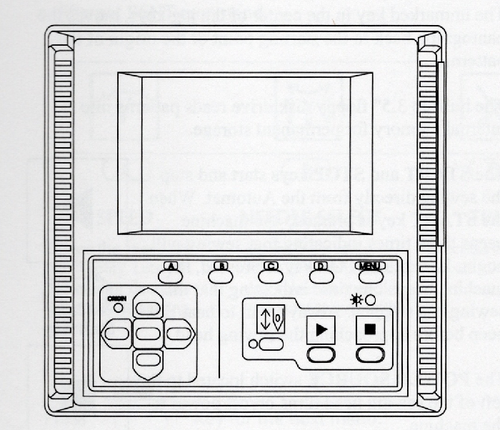
- 1.1.1 The Automat has a LCD and a series of buttons. The icons about these buttons change according to the various functions being performed during the embroidery process.
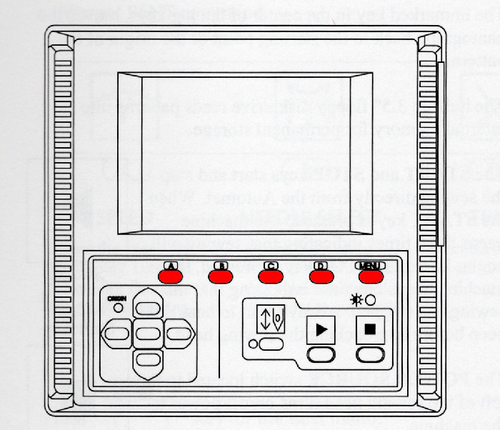
- 1.1.2 The Menu keys (A-D and Menu) correspond to the icons which are displayed above them on the LCD. The 'Menu' key moves to the next set of commands.
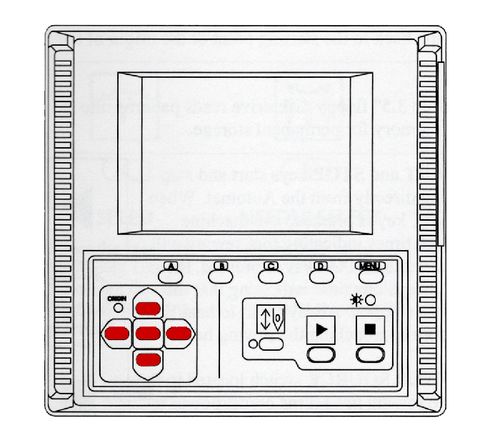
- 1.1.3 The set of Jog Keys allow you to move the pantograph to position the item you're embroidering under the sewing head.
- 1.1.4 The button under the Needle Icon is the Drive button. When Drive is engaged, the amber light is steady on. When the amber light is blinking, Drive is disengaged. The button under the green icon with the arrow is Go, and the button under the red icon with the square is Stop. if there are problems with the process, use the Stop button.
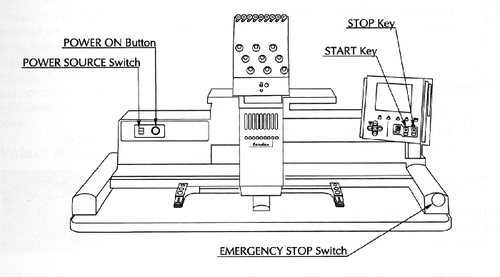
- 1.1.5 THE EMERGENCY STOP BUTTON SHOULD ONLY BE USED IN THE CASE OF A TRUE EMERGENCY. If an emergency stop is required, please discontinue used until the Barudan can be inspected by one of the Persons of Contact.
- 1.1 The Automat is where you will find all of the commands for operating the machine, for moving through various menus, and for executing menu commands.
- 2 Waking the Barudan Up
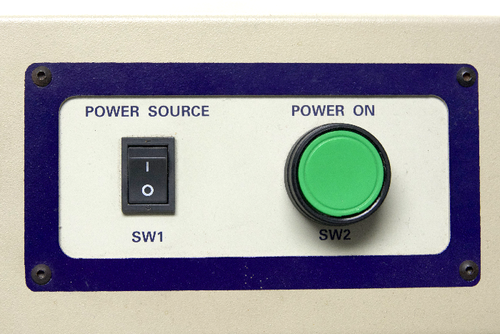
- 2.1 Turn on the power switch and press the green button.
- 2.2 If all files were removed from memory at the end of the previous session, you will see the error message shown below. It's the Automat's way of letting you know that there is no file saved in memory to be embroidered. Select the 'D' button under the checkbox icon to clear the warning.
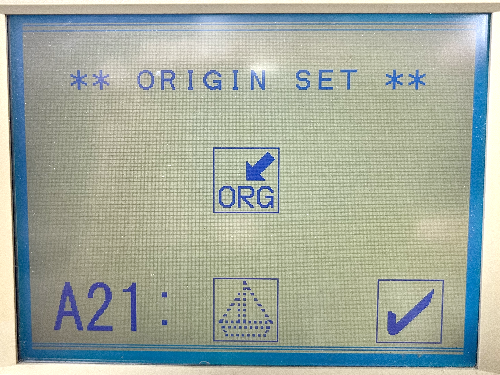
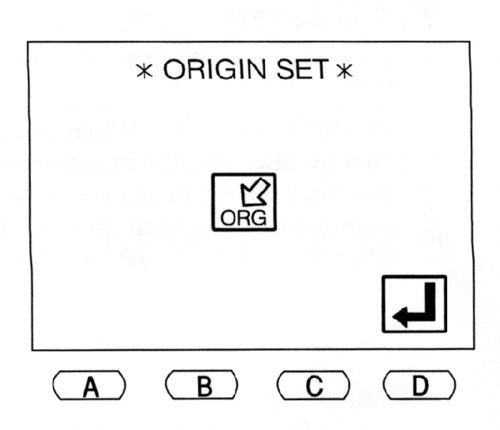
- 2.3 The next screen to appear (the first screen if there are files stored in memory) is the Origin Set Screen. Select the 'D' button under the return icon to allow the sewing head to orient itself.
Anatomy of the Automat
The Automat has a LCD and a series of buttons. The icons about these buttons change according to the various functions being performed during the embroidery process.
The Menu keys (A-D and Menu) correspond to the icons which are displayed above them on the LCD. The 'Menu' key moves to the next set of commands.
The set of Jog Keys allow you to move the pantograph to position the item you're embroidering under the sewing head.
The button under the Needle Icon is the Drive button. When Drive is engaged, the amber light is steady on. When the amber light is blinking, Drive is disengaged. The button under the green icon with the arrow is Go, and the button under the red icon with the square is Stop. if there are problems with the process, use the Stop button.
THE EMERGENCY STOP BUTTON SHOULD ONLY BE USED IN THE CASE OF A TRUE EMERGENCY. If an emergency stop is required, please discontinue used until the Barudan can be inspected by one of the Persons of Contact.
Waking the Barudan Up
Turn on the power switch and press the green button.
If all files were removed from memory at the end of the previous session, you will see the error message shown below. It's the Automat's way of letting you know that there is no file saved in memory to be embroidered. Select the 'D' button under the checkbox icon to clear the warning.
The next screen to appear (the first screen if there are files stored in memory) is the Origin Set Screen. Select the 'D' button under the return icon to allow the sewing head to orient itself.
The first screen allows the Barudan to find its place in relation to the Pantograph. Select ‘D’ under the ‘Check’ and allow the machine to reset.
If it does not end up roughly in the center of the Pantograph, then turn the machine off and pull the mechanism forward a little, then try again.
Continue with Previous Design?
Select ‘Y’ or ‘N’
The Speed, etc icon bar displays
IF THERE ARE THREADS WHICH ARE NOT STORED IN THE VELCRO TRAY BEHIND THE NEEDLES
Change the Active Needle to the one that needs to be stored.
Choose ‘Cut’ to have the thread stored. You will hear four beeps.
When all are in the Velcro storage bar, push down the presser foot for the active needle
Press and hold the jog button to move faster
Insert Floppy with desired design
Press Menu Once
Load from Floppy: Press Save (A) Select file using arrow keys,
Press “D” once to enter and it will load the Stitch File.
Select the file and watch the number of stitches load. When it’s complete, it will beep. And return you to the load/teach menu
Select your file Teach the new colors Press “C” to choose your colors.
The first stitch is JP
Second set of stitches, select “C#” with # the number of the needle using that color thread. Press Enter
repeat for each section of your design When it’s done, the previous screen reappears Press Menu twice to get back to main menu Check the placement of your design within the hoop by tracing the Perimeter. Select the Needle and, if you like, move the presser foot down. Indicator is the red dot over the actual needle and “N12”
Press ‘Menu’ twice until you see the icon for Perimeter Trace Press ‘D’ under the Perimeter Trace Button and watch for the limits of the design placement. If you need to adjust the position of your design, use the Jog keys and retry the Perimeter Trace until you are satisfied. If your design cannot be positioned so that all four corners of the Perimeter Trace are well within the hoop, remove the hoop and choose a larger one. Repeat the Perimeter Trace function to confirm placement. If the needle or presser foot hit the edge of the hoop, both your item and the machine will be damaged and you should not attempt to continue until the machine is repaired. Check the Speed The Barudan BENT operates at between 200 and 800 stitches per minute. The faster the stitch speed, the more tension is introduced and the greater the possibility for errors or thread breakage. The machine is older and if you select a speed over 625, both the machine and the floor of the loft will shake. Stitching at around 600 is fine for standard weight fabrics. Anything heavy or delicate should be done at a lower speed. Begin embroidering your design by selecting the ‘Play’ button. When the design has been completed, or you decide to abandon the attempt, select the ‘Cut’ icon, FIRST - Cut the bobbin thread by selecting ‘A’ below the ‘Cut Bobbin’ icon. SECOND – If the top thread was not cut at the end of the file, choose ‘Cut,’ then ‘Play’ so that the thread will be cut and the tail stored in the Velcro bar.
AT THE END OF YOUR SESSION If you have changed the speed, please change it back to 500. Take the bobbin case out, remove any loose thread or other debris from the area within the arm, and place 1-2 drops of oil at the base as shown. More than this will mean than excess oil will get onto the thread and the next project. Delete your file from Memory Return the needle threaders, tweezers, and applique scissors to the storage box. Check the surrounding area for anything you might have temporarily stashed during your session and return the item(s) to their proper place so the next user can find them easily. Take a moment to vacuum up all of the thread bits that have fallen to the floor, and put away the iron and ironing board if you have used them.
The Barudan is still a powerful tool, but it’s an old machine. Take your time with menus and don’t expect instant changes. Slower is generally better.
The selected needle appears on the screen and with a red dot over its presser foot. IF THESE THINGS DON'T MATCH, DO NOT USE THE MACHINE. CONTACT THE PoC IMMEDIATELY.
