Difference between revisions of "Deltamaker 2"
| Line 62: | Line 62: | ||
| 1 | | 1 | ||
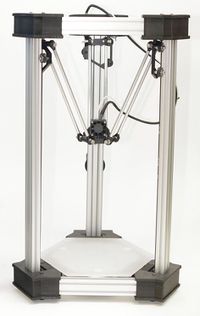
| [http://things.deltamaker.com/support/DeltaMaker-Getting-Started-Guide.pdf#page=8 Calibration] | | [http://things.deltamaker.com/support/DeltaMaker-Getting-Started-Guide.pdf#page=8 Calibration] | ||
| + | |||
| + | 1. Make sure your DeltaMaker 3D Printer is at temperature (230°C). | ||
| + | |||
| + | 2. Grasp the filament directly below the extruder drive, and pinch the trigger. | ||
| + | |||
| + | 3. PUSH a few centimeters of filament into the extruder, and observe a string of melted filament exiting the nozzle. | ||
| + | |||
| + | 4. Then, SLOWLY PULL the filament out of the extruder, and recoil it on your filament spool. | ||
| + | |||
| [[File:Deltamaker-Calibration.jpg|400px|right]] | | [[File:Deltamaker-Calibration.jpg|400px|right]] | ||
| Need volunteer! | | Need volunteer! | ||
Revision as of 15:57, 31 August 2018
REMEMBER To Reserve Time!
Various tools such as the lasers, 3D Printers, and Forest CNC need to be reserved before using the tool. There is a link on each tool's wiki page, and in each tool's Slack channel to reserve time, or you can select the tool from the MakerFX PickTime page
Note: As of March 2025, we are implementing PickTime tool by tool - review the Slack channel for each tool for current status.
NOTICE!
PLA only! No PETG or ABS / Local Source for PLA (Get MakerFX discount code from zone manager)
DeltaMaker Printers at MakerFX
The DeltaMaker printers have OctoPrint built-in which includes a built-in slicer. Click any of the printers below to be directed to OctoPrint.
Login as admin with password of 3dadmin to operate the printer.
deltamaker-0197 |
deltamaker-0187 |
deltamaker-0168 |
 |
|
|
| http://192.168.1.98 | http://192.168.1.204 | http://192.168.1.202 |
| 240mm hexagon x 260 mm | 240mm hexagon x 260 mm | 240mm hexagon x 260 mm |
| Heated Bed = NO | Heated Bed = NO | Heated Bed = NO |
| Nozzle = 0.40 | Nozzle = 0.40 | Nozzle = 0.40 |
Pre-Flight Instructions
Once these steps are completed, they do not need to be completed before each and every print in a given session. They only take a few minutes to complete and it will ensure you have a good experience with the printer.
| Step | Text Instructions | Screenshot | Video Instructions |
| 1 | Calibration
1. Make sure your DeltaMaker 3D Printer is at temperature (230°C). 2. Grasp the filament directly below the extruder drive, and pinch the trigger. 3. PUSH a few centimeters of filament into the extruder, and observe a string of melted filament exiting the nozzle. 4. Then, SLOWLY PULL the filament out of the extruder, and recoil it on your filament spool. |
 |
Need volunteer! |
| 2 | Setting nozzle height |  |
Need volunteer! |
| 3 | Instructions if you need to unload filament | Need volunteer! | |
| 4 | Loading filament | Need volunteer! | |
| 5 | Preparing to print | Need volunteer! |
Consumables
- Tape
- Sandpaper (80 grit)
- Purple Disappearing Glue Stick
Information