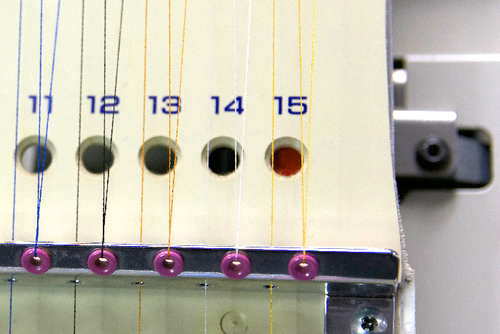
Needle Position on the Barudan BENT-ZQ-201U
The Barudan BENT-ZQ-201U has fifteen separate needles. The active needle is the one where the round hole above the last thread guide is filled with a red disc as shown below. The Needle Position is also indicated on the LCD screen. IF THESE DON'T MATCH, DO NOT USE THE MACHINE. CONTACT THE PoC IMMEDIATELY.
Contents
- 1 Changing the Active Needle
- 1.1 There are two ways to select the desired needle:
- 1.2 Needle Selection Using Needle By Needle Method
- 1.2.1 Press the Menu key until the Needle icon displays. Press B below the Needle Icon.
- 1.2.2 The Needle Selection Menu will appear. Press A below the Toward First Needle icon to move to the needle at the left of the current needle, or press B to move to the needle at the right of the current needle. Please be patient and allow plenty of time when going through the needle changing process. Don't rush the movement of the sewing head.
- 1.3 Needle Selection Using Direct Needle Method
- 1.3.1 Press the Menu key until the Needle icon displays. Press B below the Needle Icon.
- 1.3.2 The Needle Selection Menu will appear. Press C below the Direct Needle in order to select the exact needle without moving the head.
- 1.3.3 Press A or B until the display shows the desired needle number. When the desired number is displayed, press D below the Execute icon to move the head to the selected needle. The head automatically moves in the direction needed.
- 1.4 NOTE: When the machine is first powered on, the machine must be oriented to the correct position. After following the steps above, the D14 error message displays. Press the START key on the Automat.
Changing the Active Needle
There are two ways to select the desired needle:
- Needle by Needle with the A and B Keys, or;
- Selecting Direct Needles using N Keys
Needle Selection Using Needle By Needle Method
Press the Menu key until the Needle icon displays. Press B below the Needle Icon.
The Needle Selection Menu will appear. Press A below the Toward First Needle icon to move to the needle at the left of the current needle, or press B to move to the needle at the right of the current needle. Please be patient and allow plenty of time when going through the needle changing process. Don't rush the movement of the sewing head.
Needle Selection Using Direct Needle Method
Press the Menu key until the Needle icon displays. Press B below the Needle Icon.
The Needle Selection Menu will appear. Press C below the Direct Needle in order to select the exact needle without moving the head.
Press A or B until the display shows the desired needle number. When the desired number is displayed, press D below the Execute icon to move the head to the selected needle. The head automatically moves in the direction needed.


