Teaching the Barudan BENT-ZQ-201U How to Execute Your Design
Revision as of 16:10, 10 March 2023 by Carol M Franklin (talk | contribs)
Contents
- 1 Assigning Colors to be Used When Stitching Your File
- 1.1 If your file only requires one color, simply choose the Needle Position that carries your desired thread and proceed to the Perimeter Trace step below. For help with selecting the Needle, see Needle Position on the Barudan BENT-ZQ-201U
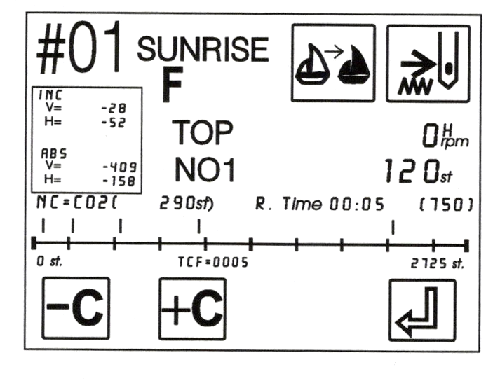
- 1.2 If there is more than one color within your design, you will have to teach the Barudan which colors are on each needle at this particular time. Choose 'C' to select the Teach menu.
- 1.3 Press 'B' below the C+ icon to cycle through the possibilities for Needle assignment. The cycle begins with other parameters; continue to press 'B' until you reach the color you desire. For instance, if you want the first section to be stitched with black thread and black is on needle 12, select 'C12'. Then press 'D' below the Enter icon to teach the machine the correct needle for that section of the file and move on to the next section of stitches.
- 1.4 Repeat this process for all needle positions. When you reach the end of your list, select C00. You will see a brief error message - A24 Unable to find Next Color Change - appear on the screen; simply select 'D' below the Execute icon to dismiss it. The screen should change back to the original menu screen.
- 2 Confirm the File Postition within the Hoop
- 2.1 Check the placement of your design within the hoop by tracing the Perimeter. It is critical that the design area fit easily into the hoop. If the needle hits the hoop, it will damage the needle, the hoop, and your project. It is easy to ensure that such a disaster never occurs, however, by using the Perimeter Trace feature.
- 2.2 If you like, make note of the currently selected needle position (whether or not it is the first needle called for in your file), and push down the corresponding presser foot so that you can see more easily where the design will be.
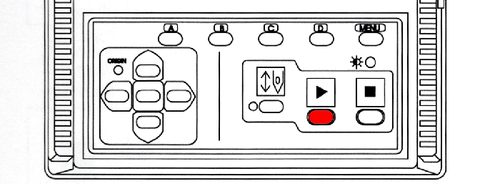
- 2.3 Press ‘Menu’ twice until you see the icon for Perimeter Trace
- 2.4 Press ‘D’ under the Perimeter Trace Button and watch for the limits of the design placement. If you need to adjust the position of your design, use the Jog keys and retry the Perimeter Trace until you are satisfied.
- 2.5 If your design cannot be positioned so that all four corners of the Perimeter Trace are well within the hoop, remove the hoop and choose a larger one. Repeat the Perimeter Trace function to confirm placement.
- 2.6 If the needle or presser foot hit the edge of the hoop, both your item and the machine will be damaged and you should not attempt to continue until the machine is repaired.
- 3 Check the Speed
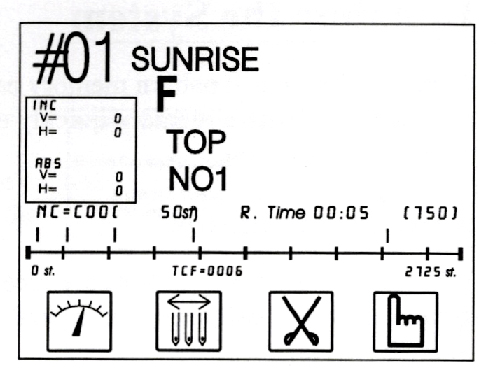
- 3.1 Your selected file should now appear on the main menu. Notice that the run time and speed are shown above the graph over the selection icons.
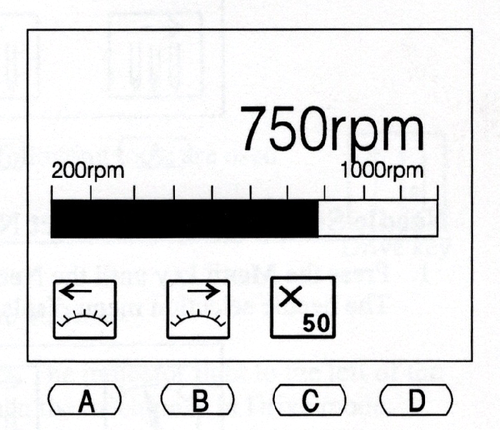
- 3.2 To adjust the embroidery speed, select 'A' below the Speed icon
- 3.3 From the Speed menu you may adjust the speed. This is permitted either before you begin stitching, or during the process if necessary.
- 4 Start Stitching Your Design
- 5 When the Design is Complete
- 5.1 When the design is complete, or you decide to abandon the attempt, select 'D' below the Checkmark Icon to bring up the main menu. (If you decide to abandon the attempt to embroider the file, press the STOP button.) Press 'C' below the Cut icon to bring up the cut menu.
- 5.2 Now you can safely pull the hoop out of the pantograph and release your item. You will probably need to take the applique scissors and trim any jump threads that are visible, and trim away the backing close to the stitching. (Follow the manufacturer's instruction for removing water soluble backing.) Press the item with the embroidery face down on a folded fluffy towel to smooth the fabric without crushing the embroidery.
- 6 Share Your Success with Us
Assigning Colors to be Used When Stitching Your File
If your file only requires one color, simply choose the Needle Position that carries your desired thread and proceed to the Perimeter Trace step below. For help with selecting the Needle, see Needle Position on the Barudan BENT-ZQ-201U
Press 'B' below the C+ icon to cycle through the possibilities for Needle assignment. The cycle begins with other parameters; continue to press 'B' until you reach the color you desire. For instance, if you want the first section to be stitched with black thread and black is on needle 12, select 'C12'. Then press 'D' below the Enter icon to teach the machine the correct needle for that section of the file and move on to the next section of stitches.
Confirm the File Postition within the Hoop
Check the placement of your design within the hoop by tracing the Perimeter. It is critical that the design area fit easily into the hoop. If the needle hits the hoop, it will damage the needle, the hoop, and your project. It is easy to ensure that such a disaster never occurs, however, by using the Perimeter Trace feature.
If you like, make note of the currently selected needle position (whether or not it is the first needle called for in your file), and push down the corresponding presser foot so that you can see more easily where the design will be.
Press ‘Menu’ twice until you see the icon for Perimeter Trace
Press ‘D’ under the Perimeter Trace Button and watch for the limits of the design placement. If you need to adjust the position of your design, use the Jog keys and retry the Perimeter Trace until you are satisfied.
If your design cannot be positioned so that all four corners of the Perimeter Trace are well within the hoop, remove the hoop and choose a larger one. Repeat the Perimeter Trace function to confirm placement.
If the needle or presser foot hit the edge of the hoop, both your item and the machine will be damaged and you should not attempt to continue until the machine is repaired.
Check the Speed
The Barudan BENT operates at between 200 and 800 stitches per minute. The faster the stitch speed, the more tension is introduced and the greater the possibility for errors or thread breakage. This machine is older and if you select a speed over 600, both the machine and the floor of the loft will shake. Stitching at around 500 is fine for standard weight fabrics. Anything heavy or delicate should be done at a lower speed.
To adjust the embroidery speed, select 'A' below the Speed icon
- Select 'A' to decrease the speed by 10 stitches per minute;
- 'B' to increase the speed by 10 stitches per minute;
- 'A' and 'C' together to decrease by 50 stitches per minute; or
- 'B' and 'C' together to increase by 50 stitches per minute.
Start Stitching Your Design
When you are satisfied that your color selection has been input and your design will fit within the hoop and is positioned where you wish for it to appear, all that's left is for you to select the 'PLAY' button to start embroidering.
When the Design is Complete
- FIRST - Cut the bobbin thread by selecting ‘A’ below the ‘Cut Bobbin’ icon.
- SECOND – If the top thread was not cut at the end of the file, choose ‘Cut,’ then ‘Play’ so that the thread will be cut and the tail stored in the Velcro bar.


