Difference between revisions of "Chevy Volt Battery Documentation"
(→Charging PPPRS 48v Modules) |
|||
| (30 intermediate revisions by the same user not shown) | |||
| Line 1: | Line 1: | ||
= Overview = | = Overview = | ||
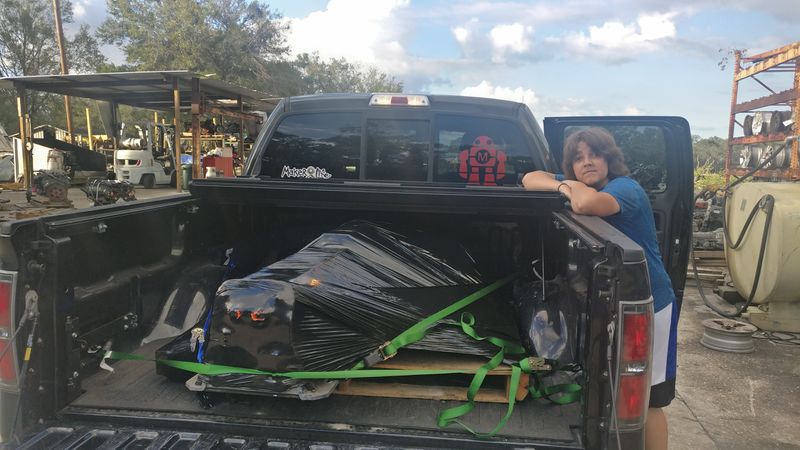
We purchased a Chevy Volt Battery (Gen 1) for $999 from [http://www.mkauto.com/ M&K Auto Parts in Orange City, Fl] on November 6, 2017. This battery will be torn down to individual modules to be used for new Power Racing Series vehicles for the 2018 season. We are expecting to get seven 48v modules, and two 24v modules from the Volt battery. These modules are heavy (~50 pounds), but should have enough power to not require a battery swap for any race including the 90 minute endurance race. | We purchased a Chevy Volt Battery (Gen 1) for $999 from [http://www.mkauto.com/ M&K Auto Parts in Orange City, Fl] on November 6, 2017. This battery will be torn down to individual modules to be used for new Power Racing Series vehicles for the 2018 season. We are expecting to get seven 48v modules, and two 24v modules from the Volt battery. These modules are heavy (~50 pounds), but should have enough power to not require a battery swap for any race including the 90 minute endurance race. | ||
| + | |||
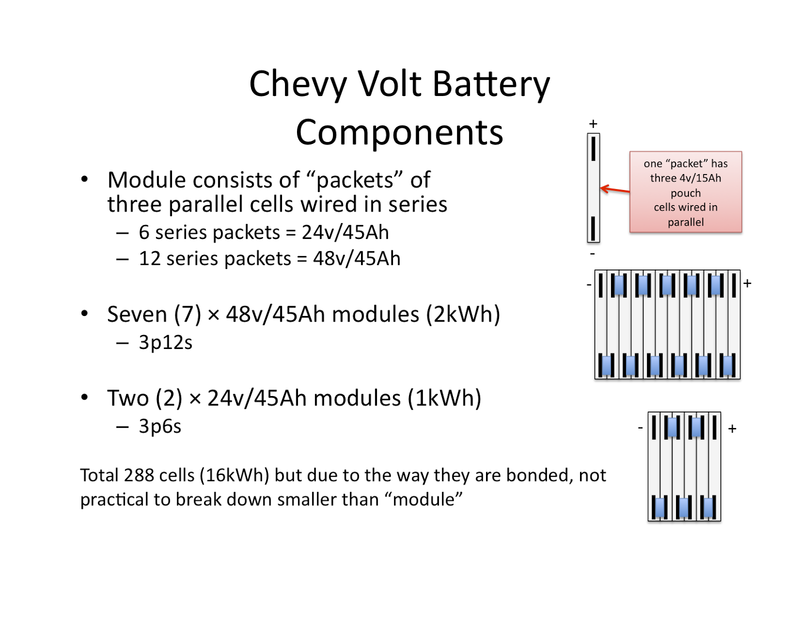
| + | The 48v modules are 12s3p configuration, however we are modifying them to be able to separate into two 6s3p packs so that we can use inexpensive dual 6s chargers. | ||
| + | |||
| + | [https://www.flickr.com/photos/iancole/albums/72157666247329369 Flickr album of all Ian's photos] | ||
| + | |||
| + | [[File:Drew volt battery.jpg|800px]] | ||
= Battery Information = | = Battery Information = | ||
| Line 6: | Line 12: | ||
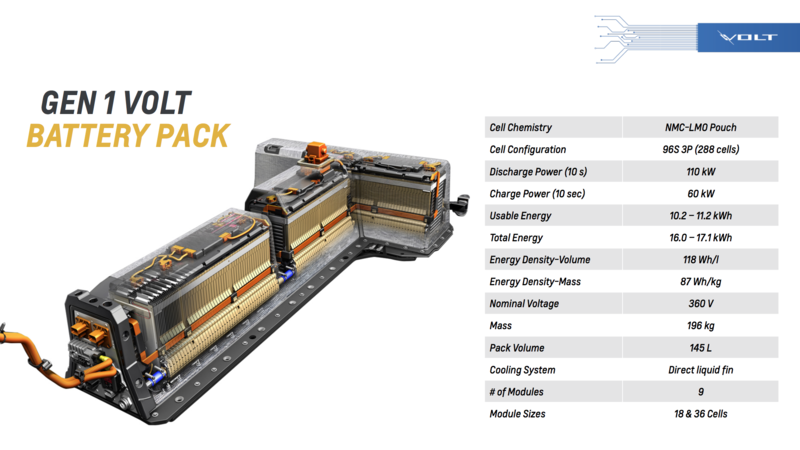
*[https://media.gm.com/content/dam/Media/microsites/product/Volt_2016/doc/VOLT_BATTERY.pdf GM Overview of Volt battery - Gen 1 & Gen 2] | *[https://media.gm.com/content/dam/Media/microsites/product/Volt_2016/doc/VOLT_BATTERY.pdf GM Overview of Volt battery - Gen 1 & Gen 2] | ||
| + | [[File:volt_battery_gen1_overview.png|800px]] | ||
| + | |||
| + | |||
| + | [[File:Chevy_Volt_Summary.png|800px]] | ||
= Teardown = | = Teardown = | ||
| + | How to | ||
| + | *[https://www.youtube.com/watch?v=00tTckGUv7I Dissecting the Chevy Volt's electric drivetrain] Shows removing the case and removing the modules | ||
| + | |||
| + | How NOT to | ||
| + | *[http://www.schultzengineering.us/delta-11-12.htm This guy took a bandsaw to his Volt modules to remove the cooling portion of the packs.] Don't do this :) | ||
| + | |||
| + | Tools we used | ||
| + | *Plastic sheeting, Bucket, Rags - there is residual coolant. Not much, but it gets everywhere. Drain at each opportunity | ||
| + | *10mm nut driver on a cordless impact driver - The deeper the better | ||
| + | *10mm socket on a socket wrench and on the cordless impact driver - for the places the nut driver wasn't deep enough | ||
| + | *Torx T-30 bit and driver - there are four Torx screws on the top of the battery enclosure by the quick disconnect. | ||
| + | *Prying screwdriver | ||
| + | *Knife - sliced the short coolant hoses, and the tape that holds the battery modules down on the side with the mounting bolts | ||
| + | *Duct Tape - taped the covers so that we'd know where to cut them with the bandsaw | ||
| + | *Bandsaw - cut the covers so that we could move each battery module with a cover on it | ||
| + | *Parts tray - lots and lots of bolts & nuts come off the battery assembly | ||
| + | *Sharpie - Label all the things | ||
| + | *Solid wire - to bind the modules together after removing the rods that hold multiple modules together. You might want to have threaded rod ready, but this worked. | ||
| + | *Big pliers - for twisting the wire to compress the modules after removing the rods | ||
| + | *Gloves - Reduce shock hazard (maybe) and helps with residual coolant and sharp edges. | ||
| + | |||
| + | You might consider | ||
| + | *Non conductive tape, or other material to cover the pack bus bars while the top covers are off. I had a really hard time remembering to NOT touch the top of the pack while the covers were off. | ||
| + | |||
| + | Teardown notes to review before jumping in | ||
| + | *LOTS OF HOT POINTS. BE CAREFUL | ||
| + | *Label the BMS modules with each pack - they differ | ||
| + | |||
| + | [[File:Volt_battery_pose.jpg|800px]] | ||
| + | |||
| + | = OEM Battery Management System = | ||
| + | *[https://www.youtube.com/watch?v=nPSWLsMrfyc Chevy Volt teardown: The battery pack] This video has some great slides showing locations of components and how cells are grouped into packs and then grouped into modules and then detailed info on the BMS. [https://www.youtube.com/watch?v=86hfYF6xXhY Alternate recording, may have better audio] | ||
| + | *[https://www.youtube.com/watch?v=Cjt-ILePQC0 Opening a VOLT BMS pack] - Note: this is really the individual "Battery Interface Module". | ||
| + | *[http://914electric.blogspot.com/2015/05/bms-battery-management-system.html?m=1 Adding an aftermarket BMS to a Volt module] - Used in an electric Porsche 914 | ||
| + | *[http://www.diyelectriccar.com/forums/showthread.php/attempting-hack-chevy-volt-drivetrain-107946p6.html Thread with CAN BUS logs and lots of other info] | ||
| + | *[http://www.europowercomponents.com/media/uploads/dhab%20s44.pdf Hall Effect Sensor datasheet] (need to confirm model, but found this in a teardown thread | ||
| + | |||
| + | = Charging PPPRS 48v Modules = | ||
| + | |||
| + | We have confirmed that we can split the 12s pack into two 6s packs for dual charging, however this requires some work with a Dremel tool that is somewhat dangerous. (Note: as of 12/4/2017, we've split one pack electrically, and done a low amp charge for over an hour - but have not moved up to high amp charging yet as we need to get better main charging cables built) | ||
| + | |||
| + | (TODO: Pics of the 6/7 tab, and the bus bar for pin 6, and how to separate them) | ||
| + | |||
| + | *[http://forum.teamlazygecko.com/viewtopic.php?f=15&t=2 Team Lazy Gecko HOWTO documentation on charging the Volt battery module] | ||
| + | *[http://lithiumate.elithion.com/php/charger.php Charging Strategies for multi-cell lithium batteries using a BMS] | ||
| + | *[http://liionbms.com/php/about_bms.php BMS fundamentals] | ||
| + | |||
| + | = Examples of Volt Battery Usage = | ||
| + | *[https://www.youtube.com/watch?v=cXCLkXePAvU Battery notes on Taylor Dunn re-power with Chevy Volt Lithium batteries] - Nice clean fuse mount on the module early in the video | ||
| + | *[https://www.youtube.com/watch?v=yCudeUYf52Q Lithium-Ion Batteries for Off-Grid Systems] Using the Volt battery for a 1kw solar system | ||
| − | = | + | = Got extra time? = |
| + | *[http://www.diyelectriccar.com/forums/showthread.php/2012-chevy-volt-battery-93101.html LONG thread on DIY Electric Car ]- very focused on using Volt batteries in electric cars, but also contains people using them for off-grid, etc. | ||
Latest revision as of 03:35, 4 December 2017
Contents
Overview
We purchased a Chevy Volt Battery (Gen 1) for $999 from M&K Auto Parts in Orange City, Fl on November 6, 2017. This battery will be torn down to individual modules to be used for new Power Racing Series vehicles for the 2018 season. We are expecting to get seven 48v modules, and two 24v modules from the Volt battery. These modules are heavy (~50 pounds), but should have enough power to not require a battery swap for any race including the 90 minute endurance race.
The 48v modules are 12s3p configuration, however we are modifying them to be able to separate into two 6s3p packs so that we can use inexpensive dual 6s chargers.
Flickr album of all Ian's photos
Battery Information
Teardown
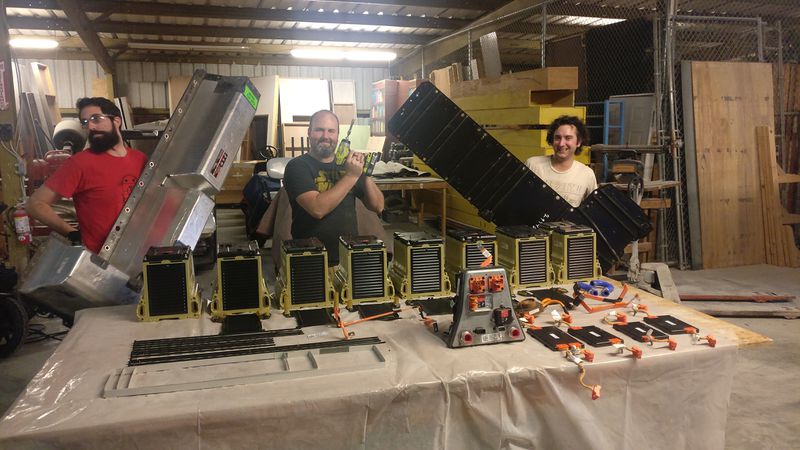
How to
- Dissecting the Chevy Volt's electric drivetrain Shows removing the case and removing the modules
How NOT to
- This guy took a bandsaw to his Volt modules to remove the cooling portion of the packs. Don't do this :)
Tools we used
- Plastic sheeting, Bucket, Rags - there is residual coolant. Not much, but it gets everywhere. Drain at each opportunity
- 10mm nut driver on a cordless impact driver - The deeper the better
- 10mm socket on a socket wrench and on the cordless impact driver - for the places the nut driver wasn't deep enough
- Torx T-30 bit and driver - there are four Torx screws on the top of the battery enclosure by the quick disconnect.
- Prying screwdriver
- Knife - sliced the short coolant hoses, and the tape that holds the battery modules down on the side with the mounting bolts
- Duct Tape - taped the covers so that we'd know where to cut them with the bandsaw
- Bandsaw - cut the covers so that we could move each battery module with a cover on it
- Parts tray - lots and lots of bolts & nuts come off the battery assembly
- Sharpie - Label all the things
- Solid wire - to bind the modules together after removing the rods that hold multiple modules together. You might want to have threaded rod ready, but this worked.
- Big pliers - for twisting the wire to compress the modules after removing the rods
- Gloves - Reduce shock hazard (maybe) and helps with residual coolant and sharp edges.
You might consider
- Non conductive tape, or other material to cover the pack bus bars while the top covers are off. I had a really hard time remembering to NOT touch the top of the pack while the covers were off.
Teardown notes to review before jumping in
- LOTS OF HOT POINTS. BE CAREFUL
- Label the BMS modules with each pack - they differ
OEM Battery Management System
- Chevy Volt teardown: The battery pack This video has some great slides showing locations of components and how cells are grouped into packs and then grouped into modules and then detailed info on the BMS. Alternate recording, may have better audio
- Opening a VOLT BMS pack - Note: this is really the individual "Battery Interface Module".
- Adding an aftermarket BMS to a Volt module - Used in an electric Porsche 914
- Thread with CAN BUS logs and lots of other info
- Hall Effect Sensor datasheet (need to confirm model, but found this in a teardown thread
Charging PPPRS 48v Modules
We have confirmed that we can split the 12s pack into two 6s packs for dual charging, however this requires some work with a Dremel tool that is somewhat dangerous. (Note: as of 12/4/2017, we've split one pack electrically, and done a low amp charge for over an hour - but have not moved up to high amp charging yet as we need to get better main charging cables built)
(TODO: Pics of the 6/7 tab, and the bus bar for pin 6, and how to separate them)
- Team Lazy Gecko HOWTO documentation on charging the Volt battery module
- Charging Strategies for multi-cell lithium batteries using a BMS
- BMS fundamentals
Examples of Volt Battery Usage
- Battery notes on Taylor Dunn re-power with Chevy Volt Lithium batteries - Nice clean fuse mount on the module early in the video
- Lithium-Ion Batteries for Off-Grid Systems Using the Volt battery for a 1kw solar system
Got extra time?
- LONG thread on DIY Electric Car - very focused on using Volt batteries in electric cars, but also contains people using them for off-grid, etc.


