What To Do When Things Go Wrong While Stitching
Revision as of 19:32, 10 March 2023 by Carol M Franklin (talk | contribs) (→Replacing a Broken Needle)
Sometimes unexpected things happen while you're embroidering a file. Here's what do to to fix the problem and get the Barudan stitching again.
Contents
- 1 Thread Problems
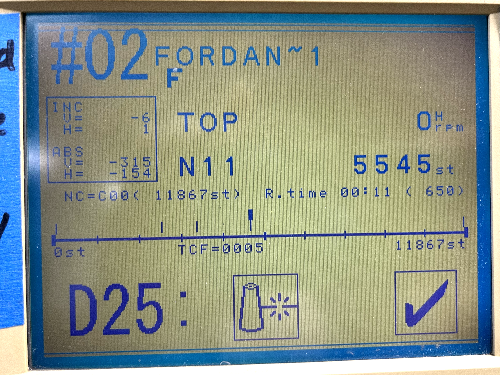
- 1.1 If stitching stops and you see this error message, then either a thread has broken or you have run out of bobbin thread.
- 1.2 If the upper thread has broken, find the end of the thread and pull to release more. You may have to reach under the metal bar and pull the screw that releases the Thread Keep in order to pull the thread. Rethread from the break, and then double check to be sure that the path of the thread is still correct all the way from the felt bar to the eye of the needle. (For help, see How to Thread the Barudan BENT-ZQ-201U)
- 1.3 If all of the upper threads are fine, then reach under the hoop, open the bobbin assembly arm, remove the bobbin case, and check to see if the bobbin thread has been exhausted. If the bobbin is empty, replace it with a full bobbin from the box nearby. (For help, see How to Change or Refill the Bobbin)
- 1.4 Be sure to check the area around the bobbin case to remove any fuzz or stray threads before reinstalling the bobbin case.
- 1.5 Once the thread issues have been taken care of, press 'D' below the Checkmark icon to dismiss the error message, and press the START button to resume stitching.
- 2 Recovering and Repairing Lost Stitches Due to Thread Breaks
- 3 Compensating for Lost Stitches Manually
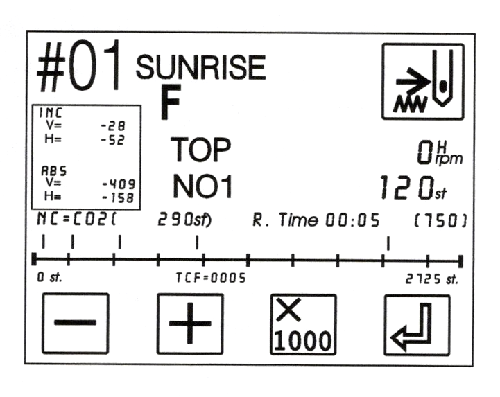
- 3.1 Press MENU until the FLOAT option appears, then press 'D' under the Float icon to engage it. The Barudan moves the sewing head without engaging the needles whenever the FLOAT feature is engaged.
- 3.2 When FLOAT is engaged, the icon is darkened:
- 3.3 Use the 'A' and 'B' buttons below the forward and reverse icons to move to the stitch where you wish to resume stitching. You should not have to use the 'x1000' feature often.
- 3.4 When you are ready to resume stitching, disengage the FLOAT from the main menu, then press the START key to continue embroidering your design.
- 4 Replacing a Broken Needle
- 4.1 If a needle breaks while you are stitching, clip the thread and retrieve any broken pieces of the needle hanging on it or lying on the work.
- 4.2 Using a small screwdriver, loosen the needle clamp screw JUST ENOUGH TO ALLOW THE SHAFT OF THE NEEDLE TO BE REMOVED
- 4.3 Insert the new needle as far up as possible, with the GROOVE SIDE IN FRONT. An improperly inserted needle will not only not sew, but can damage the hook assembly.
- 4.4 Tighten the needle clamp screw to secure the needle.
- 4.5 Re-thread the needle, clear the error message, and continue stitching.
- 5 If You Encounter Other Problems, Please Notify the Person(s) of Contact


