Difference between revisions of "Forest CNC Startup"
BradfordBenn (talk | contribs) |
|||
| (11 intermediate revisions by 2 users not shown) | |||
| Line 1: | Line 1: | ||
| + | |||
{{MFXReserveToolTime}} | {{MFXReserveToolTime}} | ||
| − | |||
| − | |||
{| class="wikitable" style="width: 85%;" | {| class="wikitable" style="width: 85%;" | ||
|- | |- | ||
| − | + | ! STEPS !! VISUAL | |
| − | + | |- | |
| − | + | | style="text-align:left; width: 50%"| | |
| − | + | === 1. Turn on the computer === | |
| − | | | + | * Press the power button on the laptop |
| − | + | * The system should auto login and launch this page | |
| − | + | | style="text-align:center; width: 50%"| | |
| − | + | [[File:CNC_Laptop_Power.png|300px|left]] | |
| − | + | |- | |
| − | | | + | | style="text-align:left; width: 50%"| |
| − | |||
| − | === 1. Turn on the computer === | ||
| − | |[[File:CNC_Laptop_Power.png|300px|left]] | ||
| − | |||
| − | | | ||
| − | | | ||
=== 2. Turn on the CNC controller === | === 2. Turn on the CNC controller === | ||
* Press the green button on the silver box mounted to the CNC machine | * Press the green button on the silver box mounted to the CNC machine | ||
| − | |[[File:CNC_Controller_Power_On.png|500px|left]] | + | | style="text-align:center; width: 50%"| |
| + | [[File:CNC_Controller_Power_On.png|500px|left]] | ||
| − | |- style=" | + | |- |
| − | | | + | | style="text-align:left; width: 50%"| |
| − | === | + | === 3. Create Machine Instructions (GCode) === |
| + | * Using VCarvePro on the CNC Router control computer convert design into machine instructions | ||
| + | * The design you have created in VCarve Pro is not a set of instructions (G-Code) for the machine yet | ||
| + | * Launch VCarve Pro | ||
| + | * Open your design file | ||
| + | * A message is displayed that the software needs to verify that the file was created in authorized software, that is normal select yes. | ||
| + | * The resulting dialog box will indicate if you can proceed with machining the file. | ||
| + | * If the software indicates that it cannot open the file, you will need to recreate the file in a properly licensed application. The instructions are on the wiki | ||
| + | * Go to the Toolpath Tab | ||
| + | * You should check the Tool Database to make sure the settings have not been modified | ||
| + | * Click the "Save Toolpaths" button | ||
| + | * Select where the file should be saved, you will need to open it again. | ||
| + | |style="text-align:center; width: 50%"| | ||
| + | [[File:VcarveToolpathTab.png|250px|left]] | ||
| + | |||
| + | |- | ||
| + | | style="text-align:left; width: 50%"| | ||
| + | === 4. Start Router Control application === | ||
* Double click the '''Router Control application''' on the desktop | * Double click the '''Router Control application''' on the desktop | ||
* Two applications actually startup... | * Two applications actually startup... | ||
| − | |[[File:CNC_Router_Control_App.png|200px|left]] | + | | style="text-align:center; width: 50%"| |
| + | [[File:CNC_Router_Control_App.png|200px|left]] | ||
| − | |- style=" | + | |- |
| − | | | + | | style="text-align:left; width: 50%"| |
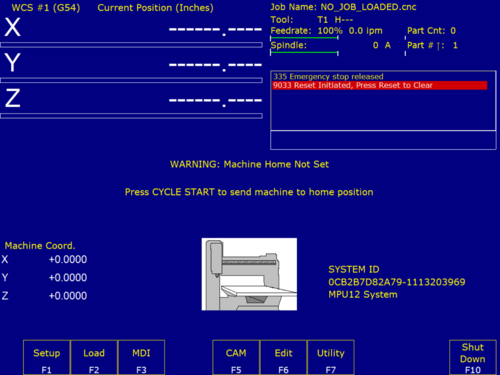
| − | === CNC Configuration === | + | ==== 4.1. Application - CNC Configuration ==== |
* The first application '''(Blue background)''' allows you to initiate functions using the function keys (F1-F10) | * The first application '''(Blue background)''' allows you to initiate functions using the function keys (F1-F10) | ||
| − | |[[File:CNC_App_Blue.png|500px|left]] | + | | style="text-align:center; width: 50%"| |
| + | [[File:CNC_App_Blue.png|500px|left]] | ||
| − | |- style=" | + | |- |
| − | | | + | | style="text-align:left; width: 50%"| |
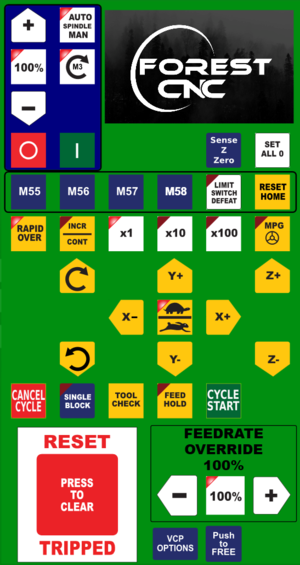
| − | === CNC Movement Control === | + | === 4.2 CNC Movement Control === |
* The second application '''(Green background)''' allows you to control the machine movement. We refer to this as CNC Controls in the remaining instructions. | * The second application '''(Green background)''' allows you to control the machine movement. We refer to this as CNC Controls in the remaining instructions. | ||
| − | |[[File:CNC_App_Green.png|300px|left]] | + | | style="text-align:center; width: 50%"| |
| + | [[File:CNC_App_Green.png|300px|left]] | ||
| − | |- style=" | + | |- |
| − | | | + | | style="text-align:left; width: 50%"| |
| − | === | + | === 5. Verify gantry in Parked position === |
* If not, using the '''CNC controls''', move the gantry to the other end of the table | * If not, using the '''CNC controls''', move the gantry to the other end of the table | ||
* '''DO NOT''' go all the way to the end, but come within a few inches | * '''DO NOT''' go all the way to the end, but come within a few inches | ||
| − | | | + | |style="text-align:center; width: 50%"| |
=== Gantry should be at the far end of the table away from the computer === | === Gantry should be at the far end of the table away from the computer === | ||
| − | |- style=" | + | |- |
| − | + | | style="text-align:left; width: 50%"| | |
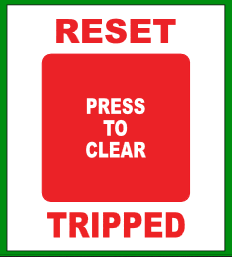
| − | === | + | === 6. Set CNC Home: RESET TRIPPED === |
*Using the CNC software on the laptop... | *Using the CNC software on the laptop... | ||
*Click the '''Big Red Reset''' button | *Click the '''Big Red Reset''' button | ||
| + | | style="text-align:center; width: 50%"| | ||
| + | [[File:CNC_Reset_Tripped.png|300px|left]] | ||
| + | |||
| + | |- | ||
| + | | style="text-align:left; width: 50%"| | ||
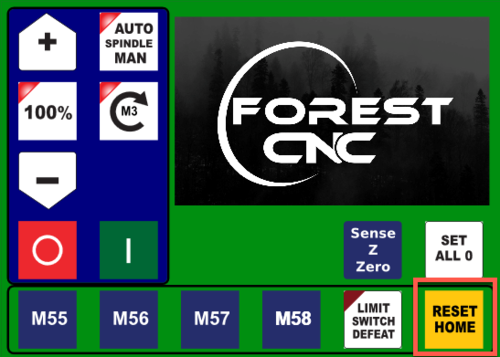
| + | === 7. Set CNC Home: RESET HOME === | ||
| + | *Using the CNC software on the laptop... | ||
*Press the '''Reset Home''' button | *Press the '''Reset Home''' button | ||
*Machine cycles through X, Y & Z limits | *Machine cycles through X, Y & Z limits | ||
| + | *An error will occur if the machine is parked against the limit switches. | ||
| + | ** Using the Movement Control Panel, move the gantry and spindle so they are not pressing against or tripping the limit switches. | ||
*X, Y & Z coordinates should all read 0 (zero) - look bottom left of the screen | *X, Y & Z coordinates should all read 0 (zero) - look bottom left of the screen | ||
| − | |[[File: | + | | style="text-align:center; width: 50%"| |
| + | [[File:CNC_Startup_Reset_Home.png|500px|left]] | ||
|- | |- | ||
| − | |[[File: | + | | style="text-align:left; width: 25%"| |
| + | === 7.1 Limit Switches === | ||
| + | | style="text-align:center; width: 75%"| | ||
| + | [[File:Forest-Stop1.jpg|150px]] [[File:Forest-Stop2.jpg|150px]] [[File:Forest-Stop3.jpg|150px]] | ||
| + | |} | ||
| − | |||
| − | |||
=== SUCCESS === | === SUCCESS === | ||
*You have successfully powered up the CNC and set the machine home position | *You have successfully powered up the CNC and set the machine home position | ||
*The next step is to '''[[Forest_CNC_Set_Job_Home | set your job home position]]''' | *The next step is to '''[[Forest_CNC_Set_Job_Home | set your job home position]]''' | ||
| − | |||
| − | | | + | == Next Step == |
| + | [[ Forest_CNC_Set_Job_Home | Click here for the next step ]] | ||
| + | |||
| + | |||
| + | [[Category:CNC Router]] | ||
Latest revision as of 12:21, 7 May 2024
edit
REMEMBER To Reserve Time!
Various tools such as the lasers, 3D Printers, and Forest CNC need to be reserved before using the tool. There is a link on each tool's wiki page, and in each tool's Slack channel to reserve time, or you can select the tool from the MakerFX PickTime page
Note: As of March 2025, we are implementing PickTime tool by tool - review the Slack channel for each tool for current status.
| STEPS | VISUAL |
|---|---|
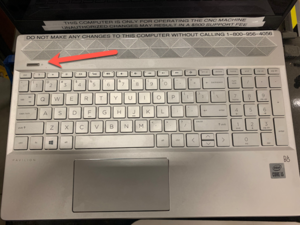
1. Turn on the computer
|
|
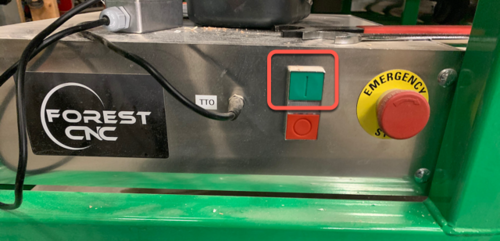
2. Turn on the CNC controller
|
|
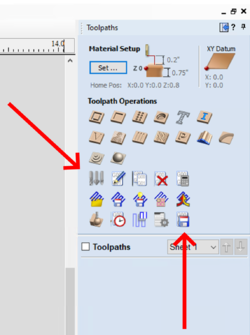
3. Create Machine Instructions (GCode)
|
|
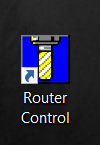
4. Start Router Control application
|
|
4.1. Application - CNC Configuration
|
|
4.2 CNC Movement Control
|
|
5. Verify gantry in Parked position
|
Gantry should be at the far end of the table away from the computer |
6. Set CNC Home: RESET TRIPPED
|
|
7. Set CNC Home: RESET HOME
|
|
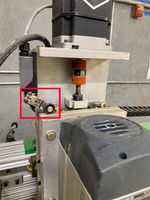
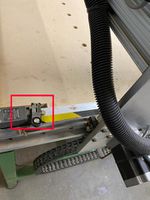
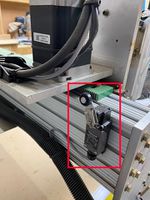
7.1 Limit Switches |
SUCCESS
- You have successfully powered up the CNC and set the machine home position
- The next step is to set your job home position
